Most days, I feel like there is so much on my plate that when something…
Kombucha!
 Have you ever thought about making your own kombucha!?! To start with you will need a kombucha scoby (see the fascinating organism at left and then below at right!). The kombucha scoby, often called a kombucha mushroom, is a colony of yeasts that digest sugar and caffeine to create that great kombucha taste that is all the rave these days. Kombucha is a fermented drink that contains probiotic cultures, carbonation and small amounts of alcohol (all natural byproducts of the fermentation process). Because most kombucha is made using a base of sugar and black or green tea there will be varying amounts of sugar and caffeine in the finished product, depending on the length of fermentation.
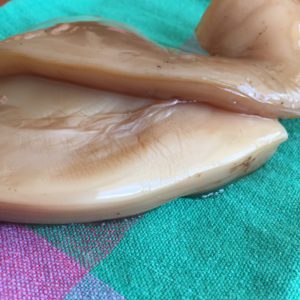 The best place to get a scoby is from a friend or neighbor who makes kombucha, although I suspect you can also buy one online. Each time you make a batch of kombucha the scoby will double in size (and make a second mushroom, sometimes called a baby) and you will only use half (one of these scobys) in the following batch. This means that those of us who make kombucha regularly usually have a scoby to share. I got my first scoby off the “wanted” section of Craigslist when I was living in San Francisco, I traded it for herbal medicine! At right here are a few pieces of my mother scoby, I cut it into pieces to give away to my students.
People often ask me if it is possible to make kombucha using herbal tea and honey, or other natural sweeteners, instead of caffeinated tea and sugar. I have found that the caffeine does help to sustain the life of the scoby (after all that is a major food source for it) and making repeated batches of herbal kombucha without caffeine can cause a mushroom to weaken, die or form mold. Using natural sweeteners adds more variables to your kombucha, because the natural unrefined sweeteners such as honey, will introduce other yeasts and bacteria that could contaminate or compete with your kombucha culture. You can always try using a combination of herbal and caffeinated teas – experiment! The worst thing that can happen is that your scoby will mold or go bad and you will have a spoiled batch – if at first you don’t succeed, try, try again.
Pieces of scoby can be stored in the refrigerator (see note below) in a bit of kombucha liquid for up to 6 months. If you want to experiment using herbal tea or honey, consider keeping a back up piece of scoby in the fridge in case you need it to fall back on.
 Ingredients
1 gallon well water or filtered water (do not use water treated with chlorine or chloramine unless it is properly filtered)
5 black tea bags OR 5 tsp. loose black or green tea OR 5 Tbs. dried herbs such as hibiscus, nettle, lemon balm, etc.)
1 cup sugar (I use raw, unrefined cane sugar)
Kombucha scoby (a small piece will do)
1/2 – 1 cup of kombucha liquid from a previous batch
1 – 2 gallon glass, food grade or ceramic (like a crock) sized container for fermenting
To Prepare:
Note that during the preparation process it is best to keep everything clean so that you do not expose the scoby to any bacteria or mold that will compete with the culture or cause it to spoil.
Step 1: Bring 1 gallon of water to a boil. Turn off the heat, add tea bags, loose tea or herbs and sugar, stir until sugar is dissolved. Cover with a lid and let sit until the tea has cooled to room temperature, I usually make it before bed and strain it in the morning.
Step 2: Strain herbs or tea bags from sugar/water/tea mixture and pour into a 1 – 2 gallon container. The container should be food grade – a fermenting crock works well, so does a glass jar or container (old, cleaned fish tank!?!), or a food grade plastic bucket. I have several students who use glass containers with a spigot at the bottom, they then drink the kombucha right from the tap! Place the kombucha scoby into the prepared liquid along with 1/2 to 1 cup of kombucha liquid. This can be kombucha left over from a previous batch (if you get a scoby from a friend they will likely give you the scoby in some liquid) or from a store bought type of kombucha that you enjoy. The kombucha liquid will serve as a starter, to help get the batch going.
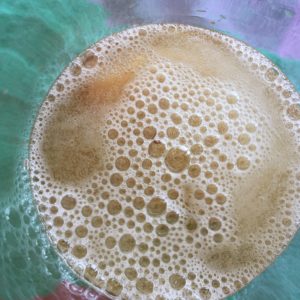
Step 3: Cover the opening of the container you choose with a clean cloth and secure it with a piece of twine or a rubber band, this will keep flies and other critters out. Let the kombucha sit for 2 – 4 weeks. The length of time it takes to be ready depends on the temperature (it will ferment faster in warmer temperatures and slower in cooler temperatures) and your preferred kombucha flavor – some like sweet kombucha, others like it more sour and vinegar-y. The longer the kombucha ferments for the more sugar will be eaten, the less sweet it will taste and the more vinegar-y it will taste. In fact, if you let it sit for a long time you will make kombucha vinegar…it’s pretty good actually. I suggest you taste the kombucha after a week and then every few days after that, when you like how it tastes, its ready.
Step 4: Remove the scobies (remember, now there are two of them!) from the container and set them aside with 1 – 2 cups of kombucha. Transfer the remaining kombucha to glass containers with tight fitting lids. A tight fitting lid will help hold carbonation in the bottle. Store kombucha in the refrigerator, it will last for 4 – 6 weeks.
What to do with all these scobies?
You can use one of your scobies and some of the kombucha as the base of the next batch. Extra kombucha scobies can be stored in the refrigerator in kombucha liquid for months at a time (store in a glass jar or a well sealed plastic bag). It is good to have one on hand to give away or in case something happens to your other scoby. If you can’t give these scopies away fast enough, you can always compost them.
How much to drink?
Like many other drinks in our culture, people commonly drink too much kombucha. I think kombucha is healthiest as a small part of the diet, like most fermented foods a condiment sized portion should do. Anywhere from 3 – 6 ounces of kombucha a day is a healthy supplement to most people’s diets. If kombucha upsets your stomach or causes any other upsets, it might not be the best drink for you.
Notes:
Oil will kill your kombucha scoby, so do not use any teas that are flavored with oils. Examples include bergamont in earl grey and lemon oil in some herbal teas.
If mold forms on top of your scoby during the fermentation process you can either cut it out and hope it does not form anywhere else on the mushroom or you can discard the batch and start over with a stored mushroom (this is the benefit of keeping a scoby stored in the fridge). If you do not have a back up scoby you can try cutting off a non-moldy part of the same scoby and use it as the base of a new batch.
If your kombucha is not carbonated at the time of bottling, or if it looses carbonation in the refrigerator before you have a chance to drink it, you can let it sit out at room temperature in a container with a tight fitting lid. In this case gentle fermentation will continue under the presence of living organisms left in the kombucha even after the scoby is removed, this will help build carbonation up inside the container. Remember, carbonation is a natural byproduct of fermentation. For carbonation to build up it must be in a sealed container, or else the carbonation will escape!
If you want to flavor your kombucha you can add juice, herbs or other flavoring agents after you have bottled it. For example, I sometimes like to add a few slices of fresh ginger to the bottle with the kombucha before it goes in the fridge. You could also add juiced ginger, or fruit juices.
Related Posts